Sunday, October 31, 2010

Happy Halloween and look what I was lucky enough to win!

Happy HALLOWEEN everyone!!  I wanted to share what I got in the mail yesterday from Maridith at Strictly Homemade.  She so graciously hosted a Gifts from the Heart Party, which she hosts on the 20th of each Month and guess what...I won these gorgeouse, cute, fantastic, lovely, precious Witches Boots Towels. 
SEE....They are so CUTE on my oven doors!!!!
She also sent a bag of CANDY CORN as a Treat!
I don't know how she knew that this was my favorite?
THANK YOU Marideth for these Wonderful Towels!!!

AND, two days after I got word that I had won the towel beauties, I got word from Lori at
Life is Lori that I had won her $65.00 CSN giveaway thru her
Get your craft on Thurs.
 Get Your Craft On Thursday Blog Party! 
Wow, I was walking on air and couldn't believe my luck.
(Should have gone to Vegas, huh?)  Well, all I can say to these two wonderful ladies is....THANK YOU from the bottom of my heart!!!
Hope everyone has a wonderful, Happy Halloween!!

Thursday, October 28, 2010

A Little Transformation

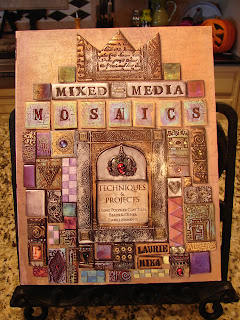
I wanted to share a piece of art that I completed.  It may not be classified as "Real Art", but I love it.  It has a few components to the makeup of the finished piece.  I took a garage sale frame, I ALWAYS  pick up a good frame if they have one.  I have a stash of about 10 in different sizes.  I also used an old canvas out of another garage sale frame. You don't have to like the picture, you can paint over it! I textured, painted and distressed the frame.  I took an old piece of metal I had found in a field and attached that to the canvas.  Now the tiles were inspired by a book I have from the Artist, Laurie Mika.
I ordered mine from Amazon. 
 Laurie uses polymer clay, rolls it to about 1/2" thickness, cuts it into shapes and paints them. After cutting my shapes I stamped them with rubber stamps and made indention's with a knife for texture as Laurie does.   I LOVE MacKenzie-Childs, so I painted mine bolder with a little black and white checks.

  After baking them, I glued them onto my metal sheet in a pattern I liked. I then attached the metal to my repainted canvas. Then I attached my canvas onto the back of the distressed frame. Notice the canvas is smaller and doesn't fit exactly into the frame.  I like the way my wall shows on the sides of the canvas.  Here is the closer view of the tiles and the finished piece as it hangs on the wall. If you have any questions, let me know! 
 Enjoy and try one yourself!
Close up view (note to self) it's a little crooked

 Finished Piece!

Blog Parties I'm Linking Too!

Photobucket

The Shabby Nest
Photobucket
150 2 Fab Friday #21

Photobucket
Keeping It Simple


Photobucket
Beyond The Picket Fence


Monday, October 25, 2010

Monday Makeovers #2-Candle Holder Makeover

Good Afternoon Everyone and hope all your weekends were great.  Before I post my Makeover Monday, I wanted to share the best Makeover that I was blessed with this morning.  God made over My Sunrise this morning in SPECTACULAR fashion underneath this Amarillo Sky.
Here it is in what a picture can capture...
Now to my makeover.  This weekend my sweet hubby got me a candle at Tractor Supply.  Paula Deen's Spiced Pear.  The Large one I got at a little boutique in town that carries Circle E candles.  I drew a 30% off coupon out of a bag, (trick or treat sale) and used it to purchase this 300 hour burning candle with reusable cookie jar for 35.00.   Both candles were Spring looking, light green and light blue so I decided to recover them to coordinate with my decor.  I spliced two 12 x 12 pieces of Scrapbook Paper together then cut to height.  Used a little Mod Podge to attach.  Yes there will be a few crinkles in the paper.  There is no way to affix square paper to a round curved cylinder!  I tried.  Then I used ribbon I had and attached a metal heart from my stash to the smaller one.  I think they are happier with how much cuter they are also! Recycle, Repurpose and Relove! Have a blessed day everyone and go MakeOver Something.
Plain Candles Before
All Dressed Up....Ready to go...
  1. Joining  Craft-O-Maniac Monday Linky Party  for some GREAT craft and decor ideas.  Head on over!
  2. Linking up with Making Monday Marvelous day at C.R.A.F.T.-better go over and check it out!
  3. Super Blog with a great linky Party for Monday, Keeping it Simple for Motivate Me Monday#41.
  4. Tuesday Fun at Tip Junkies's  Tip Me Tuesday!all crafts Handmade Projects ~ Tip Me Tuesday
  5. Hurry OVER to Today's Creative Blog and Get your Craft On!
  6. Sugar Bee Craft Creation has some great Ideas for her Take-a-Look Tuesday!
  7. Your missing out if you don't go to All Thingz Related and check out her Anything Related #29!
  8. Wednesday ideas at  . Head on over!
  9. Thursday heading over to Somewhat Simple for a great SYS Blog Party Link with The Ribbon Retreat Giveaway. Check it out!
  10. Another Great Thursday Blog Party Link is at Tales from Bloggeritaville's  .  Head on over for some Great Idea's and a trip to a Beautiful Beach somewhere!

Thursday, October 21, 2010

Tutorial Thursday-Easy, Inexpensive Halloween Decor!

                   Today’s Tutorial involves very simple supplies.
 
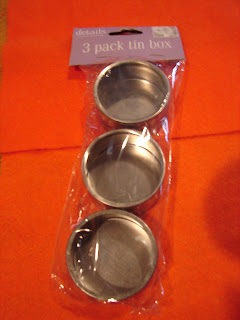
Three Metal Tins from the Dollar Tree, 3 for $1.00 (in Wedding Section)
 
Next pick out your papers, I am using a Halloween Theme...


Yeah, I have a Cricut Now!!  I am cutting my circles out with this.  I used the Simply Sweet Cartridge and the Large Circle is cut with the 2" setting, the Smaller circle with a 1 1/4" setting and the Letters are cut with a 1" setting.
If you don’t have a cutter just cut 3 circles to fit inside the lid. (You can take the plastic insert out and use as guide, just cut it a little smaller to fit inside your metal lid.) Then cut 3 smaller circles out the size you choose.  Then 3 letters for the word Boo.  I have also used these for Christmas spelling, Joy, Merry Christmas, Kids names, Love, Hope, etc…
Now you will have everything cut out and ready for assembling.
Once you have the paper cut, take out the plastic insert in the lid and clean off any smudges. These pop out really easily so I take a lil' bit of glue adhesive and place a dot in the 12, 3, 6 and 9 position on the inside of the metal lid and plastic to hold into place.
Pop plastic insert back into metal lid and push hard.  You will hear a pop when it is in properly and let the glue dry for just a bit.  Then take your paper and adhere all layers together, large first, smaller circle second and letter on top. 

All assembled and ready for the Tins.
Then you can place another small bit of adhesive onto your paper corners in the 12, 3, 6 and 9 position and pop into your lid.  Secure lid to box and you’re done.
 
I added a small bow on top for embellishment and attached mine together with a dot of hot glue so .they will stay in place and not roll everywhere!
 This project cost:  $1.00 for tins, approx. Ten Cents in Paper
Here is the one I did from last year that I cut out by hand.  See it’s just as good, just takes a little while longer.   The letters were printed on my computer on a white sheet of paper and cut out into circles.  I then painted the white with a marker and embellished with glitter. You could use letter rub- ons, stickers or hand write your letters yourself.    I also added a pumpkin inside an extra lid to the top.
Happy Halloween!!  All sparkled up! 

Blessings,   from Denise...
Get over quick to Strictly Homemadefor a wonderful Gifts from the Heart Party and CUTE Giveaway.

Head over to Life as Lori Get your craft on Thurs.  check out the great CSN 65.00 Give-away and join her blog!
Also, Somewhat Simple  for many more ideas.  Great Simply Camo
Giveaway!
Head over to Pink Dandy for lots of Great Sunday Inspirations

Monday, October 18, 2010

Mosaic Window Redo


I love to take old things and make them over into something useful.  Here is a picture of an old 5.00 garage sale window that I made a mosaic on.  The glass pieces are marbles that I found at the dollar store and stained glass scraps I cut into square shapes.  The fleur-de-li is a plaster cast I made in sand using an old finial.  Painted the frame black and put a crackle finish on it.  It is in a morning window and when the sun shines in, it makes a beautiful pattern on the floor.  Get busy remaking old junk into wonderful new treasures.

Its So Very Cheri
Go visit , Between Naps on the Porchat Between Naps on the Porch for other Great Makeover Ideas!
Also joined  Dear Little Red House for Mosiac Monday.
Head on over the Get Your Craft On for many creative Ideas.
Get over to The Shabby Nest for Frugal Fridays!
Head over to Lamb Around for some Sunday fun...

PhotobucketPLEASE head over to Seeds on a Breeze for some Wonderful Sunday Art Therapy!!!