Showing posts with label Holiday. Show all posts

Monday, December 6, 2010

3 Microscopic Slide Pendants-#31, 32, 33 in a CADWCA series

Hi all my wonderful, crazy, hilarious, SWEET and lovely peeps in Bloggy Land.  I was crazy for the glass slide pendants when they all hit the stores and since I had done some stained glass a LONG time ago, I found my old soldering iron and supplies and have made quite a few. (SANTA, my iron is 30+ years old and this would be a Nice present.
I decided to make some Christmas ones for the Daughter and Myself.  I will share a secret..... get online and type in Microscopic Lab Slides.  These are what I use..CHEAP!!! I have a whole box of 200 for 7.96 and that was about 3 years ago.  But beware, these are thin and break easily, especially when you are burnishing the edges that have the copper foil on them.  Pop, Crack, Break...don't press down unless it's on a flat surface...and the hardest part is getting the jump ring on the top of the pendant for me.  A little trying in the patience department, but I love them once they are done. 
 Okay, here they are and if you have any questions, give me a ring on the email.

I printed off a vintage Santa, glittered him...of COURSE! Remember the saying?? "Glitter makes EVERYTHING, BETTER!!
Put on my words and used a Snowman punch and  inked letters spelling, "Snow" on the backs. 
Here they are all Foiled up with the Copper tape.  Sandwich your two Papers between 2 slides and squeeze really hard when your applying your copper tape.
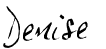
Here the 3 are after Soldering and attached with a silver ball chain!
 Sorry for the glare..Santa are you listening?? This lady needs a new camera please!!!!
Many Blessings to all of you...

I'll be at the PARTIES, if you wanna find me today...

Wednesday, December 1, 2010

I'm Back and Rolling with the Holidays! 9 Projects today Gals! #21-29 in CADWCA Series.

Hello again, I'm back from the Thanksgiving break and have missed you all!  It's December 1st, Oh my, panic!! But I am vowing to enjoy each and everyday and remember the reason for the season. So here are the latest in my series, Craft a Day While Colt's Away.  I did a few before I left and a few when I got back.  Get that coffee or hot chocolate and enjoy this ride.  This is a long post....9 Projects in all!
Okay, for the first three, I used Feed sack Dish Towels I got at the Dollar Store.  3 LARGE towels for 2.50..
I made a small pillow, used embossing ink and powder. I heated the sack and actually burned it to give it an aged look.
Made a Large "Joy" pillow using Freezer Paper to make the Stencil and Red Acrylic paint
I saw this Ho to the Third power (Ho, Ho, Ho) in a Boutique in Dallas and made one for my Oven Door.
Used Freezer Paper to make a Stencil, Red Acrylic Paint and Glitter Glue to Outline.
Simple Dollar Store Tags, Aged with Distressing Inks and Stamped with Christmas Words and Numbers.
I'm using them on my Christmas Packages
I took two Colors of Scrapbook Paper and cut them to equal size. I used Embossing Ink and Powder to monogram them with the Letter J in Silver.  Tied the 9 pieces together with ribbon to make a tag pad 
I used an Old Silver Tray from Goodwill that I got for a $1.00--I put a piece of Scrapbook Paper on the bottom and used my bottle caps to make magnets.
More Bottle caps with Scrapbook Paper and Glitter.  Attached to a $1.00 unfinished Michael's frame painted Black.  Covered the paper insert with Scrapbook paper.  Waiting for a picture...
This is a $1.00 Michael's Wood Cross that I painted Black and added Different Colored Marbles too..


And lastly, I took a canvas board that my Daughter, Maisie had painted and distressed.  There are so many wonderful layers, textures and colors on it.  I just put old Metal pieces on it and used more Bottle Cap magnets to make a sweet and interesting note holder! This is my favorite! Junky and Colorful.
Make it a Wonderful Day. 

Denise
Linking up to these Wonderful Parties!

Wednesday, November 24, 2010

Dreadful Topiary turned into Fab Chicken Roost!! #20 in the CADWCA Series

Happy Wednesday all.  Today I took a poor, dreadful, neglected topiary frame that was sitting on our deck and Recycled, Repurposed and now I ReLove it!!  She used to have Fake Green Ivy on her, but lost ALL of it!  So I gave her new life as my Christmas Ball Topiary Tree!
Here is the Poor Girl Before....
I wrapped the form with Ribbon so it would Hold the Balls
I used leftover's I had and Target $1.00 balls for a pkg of 6
(Target Dollar Aisle people!!)

And here she is in All her New Christmas Glory!

I think Christmas Chicken found a New Place to Roost!!


Heading over to The Thrifty Home Penny Pinching Party!


Monday, November 22, 2010

GLUE and GLITTER Monogram Letters and 3 more projects. (CADWCA) #15,16,17 & 18

Well Good Monday to you all!  Hope you are all ready for Thanksgiving Week! I know I am. My daughter and I are heading to the Dallas area to be with the Brothers and Families for Thanksgiving.  So, here are the latest in the Series, Craft a Day While Colt's Away.  Everyone have a great day for me, Okay!!
I used Three Wedding Favor Tins from the Dollar Tree, added Scrapbook Paper, Letters to spell "Joy",  Ribbon and Christmas Balls.  I then set it inside my Berry Wreath..
I took Cardstock and Craft Paper, Stitched them together on my Sewing Machine with  Decorative Stitch's, added the Word "NOEL" with Scrabble Tiles, a few Crystals and Leopard Ribbon
I made a "Merry Christmas" banner with Cardstock, Craft Paper, Glitter and Ribbon

"Merry Christmas" on the Wall

Here is #18, My Favorite and OH SO EASY!!
Take some Glue, Wax Paper and Glitter! Okay, Everyone Scream, GLITTER!!
Draw your Monogram with the Glue onto the Wax Paper and Cover in GLITTER!
Allow to dry overnight and you will have Glitter Monogram Letters.
I added Crystals and Beads to a Christmas Hanger for added Panache..
I LOVE THEM!!  Gonna make more of these babies..

Everyone have a Blessed Day!

Tuesday, November 9, 2010

Three CADWCA (Craft a Day While Colt's away) #3, 4 and 5

Good Morning Friends.  We had a very busy weekend, Volleyball playoff game and I got all my Halloween things down, boxed up and put away.(7 large plastic rubbermaid containers!!)  Well, I am doing something this year that I have NEVER done BEFORE!  I am decorating for Chistmas and will have it all completed by the 12th of November.  We are going out of town for Thanksgiving and why not go ahead and get it done so I will enjoy it for 7 weeks instead of usual 3?  (Please no hate comments for this! I am trying to distract myself!)  With our Son Colt in Iraq this year, we are trying to make our life Merry and Bright for all of us! 
I have about 25 Large Containers and 2 Large U-haul boxes. Okay guys, not a hoarder, but I have 32 years of collections and my husband has a wonderfully huge shop with great storage shelves.   I also had some wonderful help thank goodness!  My daughter Maisie and her boyfriend Saige, so kindly helped me get it all done.  My hubby and a Friend got all the lights up on our 2 story house and are starting to put lights in about 20 trees around the property.  I will post pictures after it is all lit up! 

So as promised to myself, I am going to do a craft a day while Colt is away.  I did a very small one, The Peppermint Tree,  Sunday but was to pooped out to do the pictures and post. I did the Christmas Card Picture on Monday and this morning the Sparkly Candle Redo.   (This may happen more than once people or I was thinking about 7 days in one post?)  Any thoughts on this?)

For this one I took and old vase, filled it with Large Peppermint Sticks and put 2 twig things I have in it.
I call it my Peppermint Tree.  You could put Twigs or Real Branches and hang you pictures, ornaments or whatever you want on it.

This is so Easy!  Used a Favorite Frame, took the Pic out and added a Christmas Card I had.


For this last project I took 2 candles from the dollar tree.  I then used the double-sided sticky 
  tape and put it on the top and bottom of my candle. My tape was about 1" wide.   I rolled them in Crystal and Red Seed Beads leaving the middle exposed for Ribbon.  No need to waste Tape and Beads.


I then added some ribbon around the middle,  broke off the jump ring from 2 cross charms I had.
Here they are on my Silver Candle holders.
Everyone of you have a blessed and wonderful day today!  I am planning on that myself!  Love you all.

Denise

Participating in these other wonderful blogs for awesome Ideas. 


Monday, October 25, 2010

Monday Makeovers #2-Candle Holder Makeover

Good Afternoon Everyone and hope all your weekends were great.  Before I post my Makeover Monday, I wanted to share the best Makeover that I was blessed with this morning.  God made over My Sunrise this morning in SPECTACULAR fashion underneath this Amarillo Sky.
Here it is in what a picture can capture...
Now to my makeover.  This weekend my sweet hubby got me a candle at Tractor Supply.  Paula Deen's Spiced Pear.  The Large one I got at a little boutique in town that carries Circle E candles.  I drew a 30% off coupon out of a bag, (trick or treat sale) and used it to purchase this 300 hour burning candle with reusable cookie jar for 35.00.   Both candles were Spring looking, light green and light blue so I decided to recover them to coordinate with my decor.  I spliced two 12 x 12 pieces of Scrapbook Paper together then cut to height.  Used a little Mod Podge to attach.  Yes there will be a few crinkles in the paper.  There is no way to affix square paper to a round curved cylinder!  I tried.  Then I used ribbon I had and attached a metal heart from my stash to the smaller one.  I think they are happier with how much cuter they are also! Recycle, Repurpose and Relove! Have a blessed day everyone and go MakeOver Something.
Plain Candles Before
All Dressed Up....Ready to go...
  1. Joining  Craft-O-Maniac Monday Linky Party  for some GREAT craft and decor ideas.  Head on over!
  2. Linking up with Making Monday Marvelous day at C.R.A.F.T.-better go over and check it out!
  3. Super Blog with a great linky Party for Monday, Keeping it Simple for Motivate Me Monday#41.
  4. Tuesday Fun at Tip Junkies's  Tip Me Tuesday!all crafts Handmade Projects ~ Tip Me Tuesday
  5. Hurry OVER to Today's Creative Blog and Get your Craft On!
  6. Sugar Bee Craft Creation has some great Ideas for her Take-a-Look Tuesday!
  7. Your missing out if you don't go to All Thingz Related and check out her Anything Related #29!
  8. Wednesday ideas at  . Head on over!
  9. Thursday heading over to Somewhat Simple for a great SYS Blog Party Link with The Ribbon Retreat Giveaway. Check it out!
  10. Another Great Thursday Blog Party Link is at Tales from Bloggeritaville's  .  Head on over for some Great Idea's and a trip to a Beautiful Beach somewhere!