Showing posts with label Inexpensive Decor. Show all posts

Tuesday, December 14, 2010

Scary Sleigh Turned Leopard!! #35 in the CADWCA series

I'm BACK!!!!  2 words...Computer Virus!  I have missed all of you so much!
Okay, #35 in the Craft a Day While Colt's Away!
  I had this Sleigh that I picked up at a Garage Sale. I have had it for 5 years and never used it at Christmas, cause..I wasn't digging the Snowman.  Kinda SCARY to me?? I really don't know why!  So I said, this is the year that you get a Makeover my Friend!  Here it is before..You tell me if you think he looks kinda crazy..... 
Before, the Armless, Scary, Disproportionate Snowman...

And After...Leopard Print, Red Paint and New Ribbons!  I love you so much more...
Everyone, be good to yourself and I am thinking of you all!
Blessings,  Denise....

Please join all the Fun at these Great Linky Parties!!

Tuesday, November 9, 2010

Three CADWCA (Craft a Day While Colt's away) #3, 4 and 5

Good Morning Friends.  We had a very busy weekend, Volleyball playoff game and I got all my Halloween things down, boxed up and put away.(7 large plastic rubbermaid containers!!)  Well, I am doing something this year that I have NEVER done BEFORE!  I am decorating for Chistmas and will have it all completed by the 12th of November.  We are going out of town for Thanksgiving and why not go ahead and get it done so I will enjoy it for 7 weeks instead of usual 3?  (Please no hate comments for this! I am trying to distract myself!)  With our Son Colt in Iraq this year, we are trying to make our life Merry and Bright for all of us! 
I have about 25 Large Containers and 2 Large U-haul boxes. Okay guys, not a hoarder, but I have 32 years of collections and my husband has a wonderfully huge shop with great storage shelves.   I also had some wonderful help thank goodness!  My daughter Maisie and her boyfriend Saige, so kindly helped me get it all done.  My hubby and a Friend got all the lights up on our 2 story house and are starting to put lights in about 20 trees around the property.  I will post pictures after it is all lit up! 

So as promised to myself, I am going to do a craft a day while Colt is away.  I did a very small one, The Peppermint Tree,  Sunday but was to pooped out to do the pictures and post. I did the Christmas Card Picture on Monday and this morning the Sparkly Candle Redo.   (This may happen more than once people or I was thinking about 7 days in one post?)  Any thoughts on this?)

For this one I took and old vase, filled it with Large Peppermint Sticks and put 2 twig things I have in it.
I call it my Peppermint Tree.  You could put Twigs or Real Branches and hang you pictures, ornaments or whatever you want on it.

This is so Easy!  Used a Favorite Frame, took the Pic out and added a Christmas Card I had.


For this last project I took 2 candles from the dollar tree.  I then used the double-sided sticky 
  tape and put it on the top and bottom of my candle. My tape was about 1" wide.   I rolled them in Crystal and Red Seed Beads leaving the middle exposed for Ribbon.  No need to waste Tape and Beads.


I then added some ribbon around the middle,  broke off the jump ring from 2 cross charms I had.
Here they are on my Silver Candle holders.
Everyone of you have a blessed and wonderful day today!  I am planning on that myself!  Love you all.

Denise

Participating in these other wonderful blogs for awesome Ideas. 


Saturday, November 6, 2010

Craft a Day While Colt's Away (CADWCA) #2

Good Morning Fellow Bloggers!  Colt arrived in Baghdad last nite safely. Here is the #2 project, quickly done this morning.  Am heading out in about an hour for a 8 hour round trip to a Volleyball playoff game for our High School that my Daughter cheers for.  But as promised here it is.  (ONLY 363 more or so to go!)  It makes me laugh to think about it!  Love you all...
Started out with a Plain, White Canvas (3.47 for a pack of three then 40% off at Michaels.)

  I then Modpodged Limey Green Mulberry Paper onto the canvas.  I used an Eiffel Tower Image I got off the computer.  Then scrapbook paper for the Black and White, trimmed with Red Ribbon, stamped around the edge of frame with Love Amour stamp.  To finish added a crystal to the top of the Eiffel Tower.
all crafts Handmade Projects ~ Tip Me Tuesday

Thursday, October 21, 2010

Tutorial Thursday-Easy, Inexpensive Halloween Decor!

                   Today’s Tutorial involves very simple supplies.
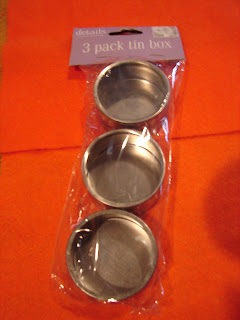
 
Three Metal Tins from the Dollar Tree, 3 for $1.00 (in Wedding Section)
 
Next pick out your papers, I am using a Halloween Theme...


Yeah, I have a Cricut Now!!  I am cutting my circles out with this.  I used the Simply Sweet Cartridge and the Large Circle is cut with the 2" setting, the Smaller circle with a 1 1/4" setting and the Letters are cut with a 1" setting.
If you don’t have a cutter just cut 3 circles to fit inside the lid. (You can take the plastic insert out and use as guide, just cut it a little smaller to fit inside your metal lid.) Then cut 3 smaller circles out the size you choose.  Then 3 letters for the word Boo.  I have also used these for Christmas spelling, Joy, Merry Christmas, Kids names, Love, Hope, etc…
Now you will have everything cut out and ready for assembling.
Once you have the paper cut, take out the plastic insert in the lid and clean off any smudges. These pop out really easily so I take a lil' bit of glue adhesive and place a dot in the 12, 3, 6 and 9 position on the inside of the metal lid and plastic to hold into place.
Pop plastic insert back into metal lid and push hard.  You will hear a pop when it is in properly and let the glue dry for just a bit.  Then take your paper and adhere all layers together, large first, smaller circle second and letter on top. 

All assembled and ready for the Tins.
Then you can place another small bit of adhesive onto your paper corners in the 12, 3, 6 and 9 position and pop into your lid.  Secure lid to box and you’re done.
 
I added a small bow on top for embellishment and attached mine together with a dot of hot glue so .they will stay in place and not roll everywhere!
 This project cost:  $1.00 for tins, approx. Ten Cents in Paper
Here is the one I did from last year that I cut out by hand.  See it’s just as good, just takes a little while longer.   The letters were printed on my computer on a white sheet of paper and cut out into circles.  I then painted the white with a marker and embellished with glitter. You could use letter rub- ons, stickers or hand write your letters yourself.    I also added a pumpkin inside an extra lid to the top.
Happy Halloween!!  All sparkled up! 

Blessings,   from Denise...
Get over quick to Strictly Homemadefor a wonderful Gifts from the Heart Party and CUTE Giveaway.

Head over to Life as Lori Get your craft on Thurs.  check out the great CSN 65.00 Give-away and join her blog!
Also, Somewhat Simple  for many more ideas.  Great Simply Camo
Giveaway!
Head over to Pink Dandy for lots of Great Sunday Inspirations